Wednesday, May 11, 2016

March and April progress

Hello all!

I know it has been quite a long time since I have updated everyone on our renovation progress, I was holding off because I was waiting for the however the bathroom is still not done, more on that later!

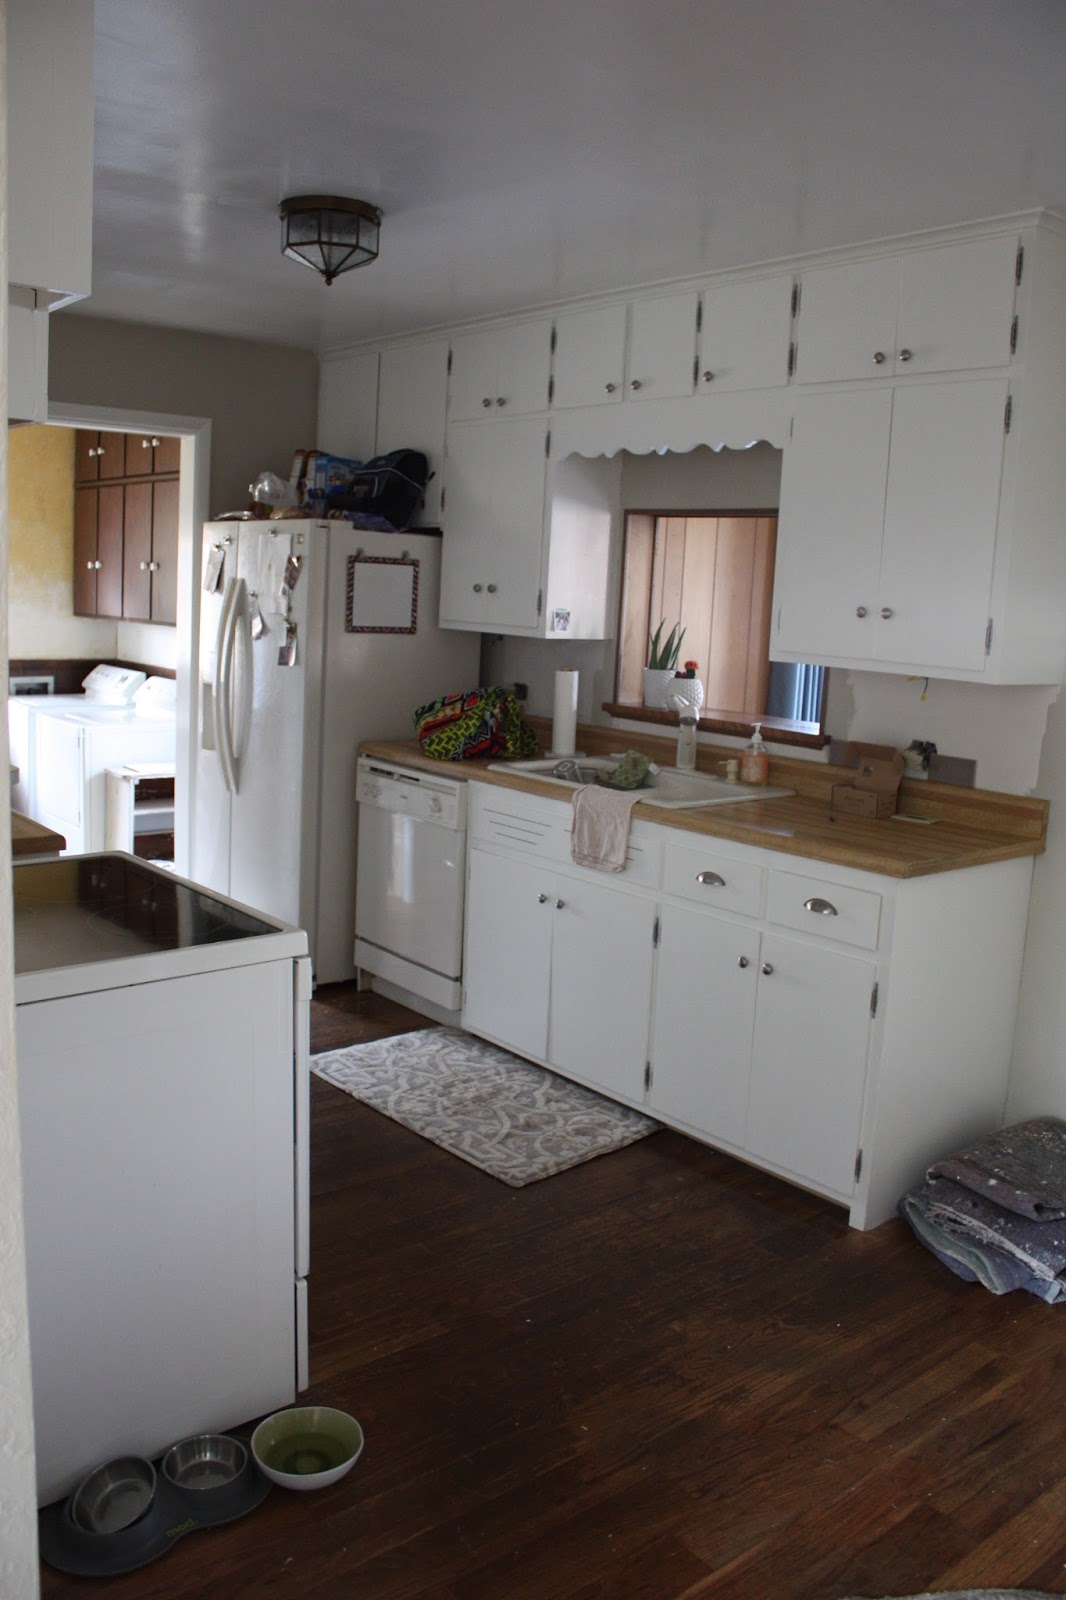
The biggest change so far has been the kitchen, I hate to walk everyone down a very ugly memory lane but this is what we started with back in January.


Gross. So dark and dated! As I mentioned before we decided to do a PHASE ONE kitchen reno, this is by no means a finished project but we wanted to spend less than $200 in this room just to make it an attractive and enjoyable space until we save to get new cabinets, counters and appliances. So we bought paint, tile and a new light fixture for the kitchen and that is ALL.


Sorry about the KW booty shot, but this is the only in progress photo I have. 


 This is just what a little paint can do, The paint for this room was under $50 and it CHANGED MY LIFE. I used the leftover trim paint to paint my cabinets, bought new hardware for 25$ and painted the hinges with metallic spraypaint and sealant (you cant even tell). 

You can see in this picture was laying out our tile choice to see how it looked, It was between that and plain white subway tile, I was originally sold on the white but changed my mind to this dark grew/brown subway by alan and roth. I had to put some color in there, Kyle was making jokes that our kitchen was so white it looked like a hospital room. 


After tile and a good cleaning up, I thought phase one was done, but it wasn't. I couldn't stand seeing those nasty counters up against my new tile. I knew even cheap laminate counters would be a dumb decision because eventually we are just going to rip them out and put stone in. I looked into those counter refinishing kits and there was no way I was paying $200 to work that hard, plus it didn't fit into the phase one budget. I thought about spray paint but its too messy. My solution is CONTACT PAPER (the website says $7 a roll but mine was $5 in store). I read up on this idea, trying to see if anyone had experience with it, people said they infact had done it and it had lasted at minimum a year and a half. You can't set hot things directly on it and you obviously cant use knives directly on it either. No problems there, I'm used to using a cutting board and hot pads.

I'm telling you right now it was a pain in the behind. I couldn't have done it alone, it is for sure a two person job. I didn't take pictures of the progress because it is pretty self explanatory- peel and stick. I used a paint stick to smooth it down, a pin to pop any air bubbles and my Walgreens card to get into tight spaces.  You for sure need to take your time around the sink, that alone took me 45 min. I am so happy with the results! I think it makes a huge difference and makes the kitchen more attractive.


We still have one more project in the kitchen and thats adding beadboard behind the open shelving. I didn't cover this section of counters because I don't mind the color and I wanted a place to set my crockpot and not discolor my new "granite."

The next few pictures are just a general update of small projects around the house!


I wish I had a before picture of this bathroom (the only bathroom we have right now)! We will probably only redo the floor in here, but that mirror unit was THE WORST. It had two yellowed plastic lights attached to the side. We simply took the mirror off, capped off the wiring, removed the lights, rehung the mirror and installed brighter lightbulbs above! And Ta-Da. Updated bathroom in 30 min or less.


This is my new Ikea couch, I saved like a crazy person for it for almost a year straight and before that I had saved for a new couch which we decided against at the time and used the money to pay off a credit card which felt SO MUCH BETTER! Now that we have almost paid off all credit card debt we thought it was an ok time for me to put my hard earned cash to what I really wanted. A COUCH. This is the ektorp in Nordvalla Dark Beige (a dark gray brown).

I'm in no way trying to brag but we have paid for all of these renovations with cash, not because we are rich but because we have been trying to get out of debt following Dave Ramsey Financial Peace. Alot of times it means moving at a slower pace and saying "no" or "later" to bigger projects. This is why our bathroom isn't done yet, we had lots of things come up and the tile for the shower and bathroom mirror just weren't in last months budget. We love working on our house but we would never want to go house poor.


These are Ikea Frames and Sam's Club prints (the prints are HUGE and only cost me $15, I love Sam's photo department don't even get me started). I think this project was $80, which isn't bad for such a big statement.


I painted my front door AGAIN, and by I, I really mean Kyle.
This color is a Sherwin Williams blue green color. It was a much needed pop of color.

That adorable little W is my favorite thing. I love a good monogram and my front door was no exception. Before we move outdoors, know our house needs a good power washing. Don't judge. It's in the garage I just haven't gotten to it yet!


Our house number sign fell off in the storm so I have to figure out a better way to attach it. 


New porch lights were just what we needed to push this house into the 21st Century, that and new iron railing, but that will come later. 


I adore our patio, we are out there all of the dang time, we love playing games outside, and eat most of our meals on weekends out there! We are also going to be updating the patio railing and the awning company is supposed to be coming by to instal the awning that came with the house....if its ugly its coming right back down, we haven't even seen it yet.  


 The den area hasn't been touched, I haven't even changed out the curtains yet. All in good time. It functions great for us now! 


 My office was a big change, I love how much light is in this room. I didn't know how much I would like it until I cleared out all the JUNK we were keeping back there. I got rid of boxes upon boxes of things I don't need anymore. I am trying to transition to minimalism, not having cluttered spaces and keeping only what I love. It has been so freeing! 


We FINALLY put our bed up on a frame and lifted it a little, I bummed these tiny antique side tables off of my mom because they fit PERFECT in the space. I still have some projects in this room but again, I'm always drooling over the light in this room. 

So many changes! I can't wait for the next update because that will mean I have a bathroom with a mirror and vanity to get ready in!


Blessings! 

Sarah & Kyle

Sunday, March 6, 2016

March Progress...So Far....

We aren't that far into March and already we have gotten a lot accomplished! 

One of my favorite changes has been our front door. We purchased the new glass storm door for our anniversary gift to each other. To many people it would be lame but to me, ITS THE BEST GIFT EVER. 

Original storm door. 

 On our Anniversary date to Menards

New Door

Inside View

For the front door itself we removed the brass kickplate, the gaudy door handle and painted the door Iron Ore by Benjamin Moore. I am super happy with the way it turned out and I think it totally changes the look of the house.

As soon as the weather warms up we have many more plans for the exterior of the house. 

The next project was to clean out the guest room. We were using it as a workshop but that has been able to move to other areas so we have a functioning room once again! If anyone needs a place to stay in Peoria, check into the hedgerow hacienda. 

Before

After.

The Guest room is one of my favorite rooms so far, I found the bedside lamp at a thrift store for $3 and knew exactly where to put it, I even had a shade for it already!

Now we move onto unfinished business. 

Meet our kitchen. 

When I met my neighbor, who is 94 years old, she told me she was glad we were updating the house because it was dated. A 94 year old woman told me my house was dated. 

I'm pretty sure that my kitchen was the main reason. 
This kitchen was DARK and I couldn't stand it so we dug in. 


We started by removing the wallpaper, taking down the lantern fixtures on the wall and patching the NIGHTMARE that was under the wallpaper. There were holes and live wires and all kinds of awful things. 

Then we moved to cosmetics. This isn't our dream kitchen by any means but we wont be able to afford a total gut job for a long time so we decided to take a note from Young House Love and work in phases.  This is phase 1/2 of our kitchen. The finished Phase one is still about a week out.

Kyle amazed me in getting this wall smooth, It was literally the biggest nightmare we have run into this far into renovations. 

With the walls primed you could really see how dark the ceiling color was.


 Priming and painting 30 kitchen cabinet doors, I can tell you at this point I am Tired of Simply White. 


You can really see how much better and BRIGHTER the kitchen is, the new hardware was an easy touch to bring the kitchen into the 21st century. When taking the old hardware off I originally wanted new hinges as well but I couldn't justify the $170 that it would have cost so I spent $15 on spray paint and painted our existing ones and I have to say, I think they look FINE. I was sure to prime them, paint them and apply two coats of sealant so that they will be durable.
We are working on the tile backsplash, the trim and the lighting (under cabinet, recessed and a new pendant for the dining area). 

We are really happy with how things are turing out so far, check back in a couple weeks to see the finished result! 


Monday, February 22, 2016

month one

Wow. We had no idea how hard renovations would be, physically and mentally.

We are one month in and we have encountered great and no so great surprises. 

To start things off we pulled off layer after layer of wallpaper, it was like a not so fun time machine.
We started removal in the master bedroom first since it was only one wall (and roller shades....).


I scored the walls and we applied piranha roll on wallpaper remover, let it sit for 15 min...nothing....20 min...nothing...40 min we were frustrated....

Even Scout was depressed. 

So we broke down and bought a steamer....I can't recommend it enough the wallpaper slid off- we literally started laughing and joking about all the people who said it was so easy- telling eachother we would go into professional wallpaper removal. We spoke too soon. 

Enter- bathroom.


No longer fun. Two layers of wallpaper and it was on good- adhered to raw plaster. 

We found nothing good in the bathroom under said wallpaper; previous electrical outlets that weren't properly terminated/covered and poorly patched holes in the walls. Add another huge hole we made to access kitchen electrical and this room currently looks like a war zone. I currently close the door and pretend like it doesn't exist. 

The Kitchen and laundry area had three layers of wallpaper that was behind all of the baseboards and appliances- toss in a few steamer burns and you have some major frustrations. This is where we broke down. 


We finally succeed though and now there is ZERO wallpaper left in our house.

It was then time for paint. I had many variations of the same color, so at least I had a general direction. This is a time in my life I like to call 50 shades of Graige.


I wound up going with Benjamin Moore Edgecomb Grey for the bedrooms and I dug up a retired color (Martha Stewart Tortilla) for the living room and hallway. 

Now for the fun part, before and afters.  

Front Living Before

Front Living Before

Front Living Before


Front Living After

Front Living After


Front Living After


Front Living After


 Hallway Before

Hallway During (notice there is no quarter round trim) 

Hallway After

Adding the quarter round trim and painting it all made SUCH a difference although I wont lie, I broke down in tears on day three of painting trim and windows. Its enough to drive you crazy.


Master Bedroom Before


Master Bedroom Before

Master Bedroom After

Master Bedroom After

Even after cleaners and multiple sanding blocks and a good washing with TSP, It took three coats of paint to make the previously wallpapered wall look even, in the next rooms that were previously wallpapered we are going to prime with Kilz and save ourselves the extra work. Lesson learned. It still turned out great though!


Guest Room Before 

Guest Room Before 

Guest Room After

Guest Room After....kind of.

We are still using this room as a work room so It will be awhile before the big reveal. 

Projects from the fist month:
-stripped all wallpaper
-removed the iron rail and tile at entry way
-removed spindles and refinished half wall
-Painted all ceilings, windows, walls and trim
-Stripped and refinished the original hardware
--removed old thermostat(s?) and (almost) installed nest thermostat.
- Removed carpets
-replaced all electrical outlets with three prong ones and switched out all light switches and covers.

Products we couldn't live without:
-Warner 5 Way Tool (this is my godsend, I cant recommend it enough)
-Frog Tape  (this tape is the BEST, we tried 3M and we were super let down)
- GooGone (we used this to remove old adhesive, paint stains etc) 

Its been so stressful at times but it is the most satisfying experience. Its still bare bones as far as decor and we still need to install ceiling fans in the bedrooms, recessed lighting in the hallway and paint the closet doors, but we are 99% done with the front half of the house and it feels GREAT! Many thanks to our parents for lending us tools, wisdom and helping hands and our friends who helped move, helped pull up carpet and helped paint. 

Next month I will post our March progress but in between I will be writing some mini posts about how we did things and some finishing touches in these spaces.